Compiling a TypeScript Module
In the previous chapter, we exported and imported a module in a .ts file. We cannot use TypeScript modules directly in our application. We need to use the JavaScript for TypeScript modules. To get the JavaScript files for the TypeScript modules, we need to compile modules using TypeScript compiler.
Compilation of a module depends on the target environment you are aiming for. The TypeScript compiler generates the JavaScript code based on the module target option specified during compilation.
Use the following command to compile a TypeScript module and generate the JavaScript code.
--module <target> <file path>
If you are using IDE, then you have to set the Module compilation target either in the IDE or in the tsconfig.json file.
The following can be used as target with the above --module command option:
Use of the above targets depend on the application and module loader you are using. For example, use CommonJS target option for server side Node.js applications where you are using CommonJS module loader; use AMD target option if you are using client side module loader require.js for the web application; use UMD target option for both client side and server side modules; use System for ES modules, use ES6 or ES2015 for ES5 modules or lower.
Let's compile the Employee module created in the previous chapter, for the client-side web application with require.js module loader. Open the command prompt on Windows, navigate to the path where the module file is stored and execute the following command:
This will generate the following JavaScript module for client-side application, which can be loaded using require.js:
define(["require", "exports"], function (require, exports) {
            "use strict";
    exports.__esModule = true;
    exports.age = 20;
            var Employee = /** @class */ (function () {
            function Employee(name, code) {
            this.name = name;
            this.empCode = code;
        }
        Employee.prototype.displayEmployee = function () {
            console.log ("Employee Code: " + this.empCode + ", Employee Name: " + this.empName );
        };
            return Employee;
    }());
    exports.Employee = Employee;
            var companyName = "XYZ";
});
Now, compile the module EmployeeProcessor (created in the previous chapter), in which we used the Employee module.
The above command will generate the following JavaScript for the EmployeeProcessor module to be used with require.js module loader in web app.
define(["require", "exports", "./Employee"], function (require, exports, Employee_1) {
            "use strict";
    exports.__esModule = true;
            var empObj = new emp.Employee("Steve Jobs", 1);
    empObj.displayEmployee();
});
Set Target Module in Visual Studio
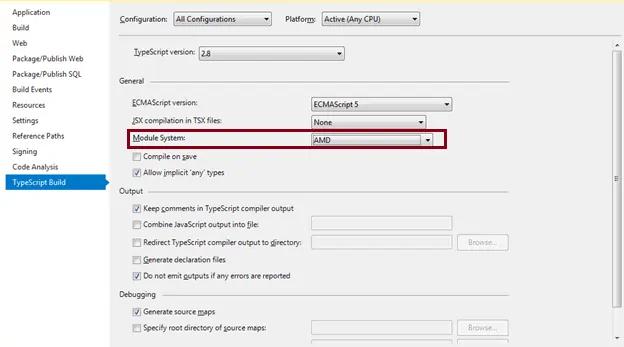
If you are using Visual Studio 2017, then you can set the module system option in the TypeScript Build tab. Open the project property by right clicking on the project in the solution explorer and select Properties. Go to the TypeScriptBuild tab in the property window and set the Module System to AMD, as shown below.

Now, Visual Studio will create JavaScript files for all the TypeScript modules targeting the require.js module loader for web app.
Using Module in Web Application
Once we generate JavaScript for our TypeScript modules, we need to use them in our application. We can use above the modules in our web page with the require.js module loader.
The following HTML file shows how to use a module with the require.js module loader in the browser.
<!DOCTYPE html>
<html lang="en">
<head>
            <script data-main="./EmployeeProcessor" type="text/javascript"
            src="https://cdnjs.cloudflare.com/ajax/libs/require.js/2.3.5/require.js"></script>
</head>
<body>
            <h1>TypeScript Module Demo</h1>
</body>
</html>
In the above html code, we included the require.min.js file from CDN using the <script> tag. The <script> tag must also specify the initial module to be loaded for your application using the data-main attribute. Thus, require.js API will load the initial module specified in the data-main attribute and all other modules will be loaded asynchronously as and when required.
This way you can export, import, compile and use modules in web application.
