What is Layout View in ASP.NET MVC
In this section, you will learn about the layout view in ASP.NET MVC.
An application may contain a specific UI portion that remains the same throughout the application, such as header, left navigation bar, right bar, or footer section. ASP.NET MVC introduced a Layout view which contains these common UI portions so that we don't have to write the same code in every page. The layout view is the same as the master page of the ASP.NET webform application.
For example, an application UI may contain a header, left menu bar, right bar, and footer section that remains the same on every page. Only the center section changes dynamically, as shown below.
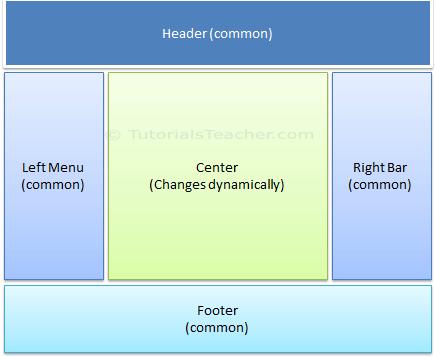
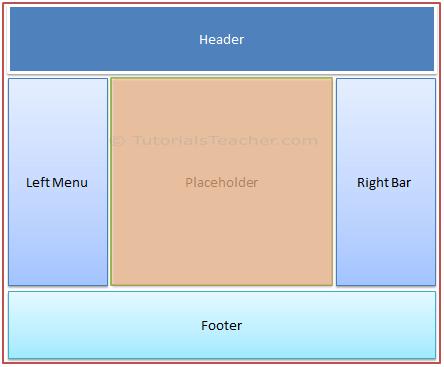
The layout view allows you to define a common site template, which can be inherited in multiple views to provide a consistent look and feel in multiple pages of an application. The layout view eliminates duplicate coding and enhances development speed and easy maintenance. The layout view for the above sample UI would contain a Header, Left Menu, Right bar, and Footer sections. It has a placeholder for the center section that changes dynamically, as shown below.
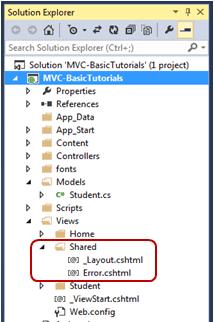
The layout view has the same extension as other views, .cshtml or .vbhtml. Layout views are shared with multiple views, so it must be stored in the Shared folder. By default, a layout view _Layout.cshtml is created when you Create MVC application using Visual Studio, as shown below.
The following is the default _Layout.cshtml.
<!DOCTYPE html>
<html>
<head>
<meta charset="utf-8" />
<meta name="viewport" content="width=device-width, initial-scale=1.0">
<title>@ViewBag.Title - My ASP.NET Application</title>
<meta property="og:title" content="@ViewBag.Title - My ASP.NET Application" />
@Styles.Render("~/Content/css")
@Scripts.Render("~/bundles/modernizr")
</head>
<body>
<div className="navbar navbar-inverse navbar-fixed-top">
<div className="container">
<div className="navbar-header">
<button type="button" className="navbar-toggle" data-toggle="collapse" data-target=".navbar-collapse">
<span className="icon-bar"></span>
<span className="icon-bar"></span>
<span className="icon-bar"></span>
</button>
@Html.ActionLink("Application name", "Index", "Home", new { area = "" }, new { @class = "navbar-brand" })
</div>
<div className="navbar-collapse collapse">
<ul className="nav navbar-nav">
<li>@Html.ActionLink("Home", "Index", "Home")</li>
<li>@Html.ActionLink("About", "About", "Home")</li>
<li>@Html.ActionLink("Contact", "Contact", "Home")</li>
</ul>
</div>
</div>
</div>
<div className="container body-content">
@RenderBody()
<hr />
<footer>
<p>© @DateTime.Now.Year - My ASP.NET Application</p>
</footer>
</div>
@Scripts.Render("~/bundles/jquery")
@Scripts.Render("~/bundles/bootstrap")
@RenderSection("scripts", required: false)
</body>
</html>As you can see, the layout view contains HTML Doctype, head, and body tags. The only difference is a call to RenderBody() and RenderSection() methods. The child views will be displayed where the RenderBody() is called.
Using Layout View
The views which will be displayed in a placeholder RenderBody() are called child views. There are multiple ways to specify which layout view will be used with which child views. You can specify it in a common _ViewStart.cshtml, in a child view, or in an action method.
ViewStart
The default _ViewStart.cshtml is included in the Views folder. It can also be created in all other Views sub-folders. It is used to specify common settings for all the views under a folder and sub-folders where it is created.
Set the Layout property to a particular layout view will be applicable to all the child views under that folder and its sub-folders.
For example, the following _ViewStart.cshtml in the Views folder sets the Layout property to "~/Views/Shared/_Layout.cshtml". So, the _layout.cshtml would be a layout view of all the views included in Views and its subfolders.
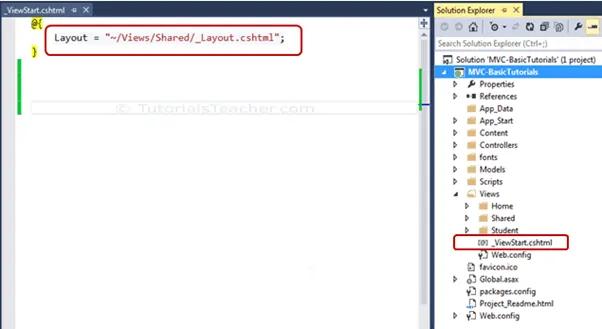
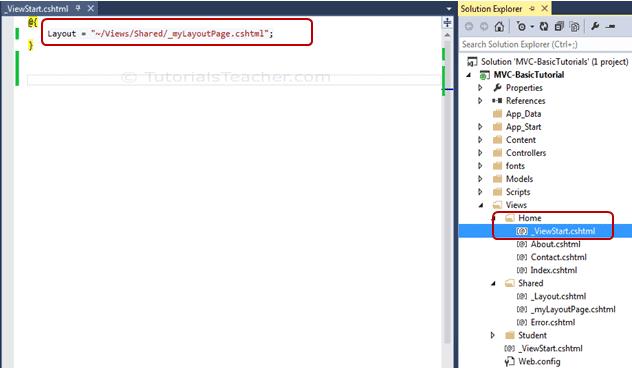
The _ViewStart.cshtml can also be created in the sub-folders of the View folder to set the default layout page for all the views included in that particular subfolder.
For example, the following _ViewStart.cshtml in the Home folder sets the Layout property to _myLayoutPage.cshtml. So now, Index.cshtml, About.cshtml and Contact.cshtml will display in the _myLayoutPage.cshtml instead of default _Layout.cshml.
Specify Layout View in a Child View
You can also override the default layout view setting of _ViewStart.cshtml by setting the Layout property in each child view. For example, the following Index.cshtml view uses the _myLayoutPage.cshtml even if _ViewStart.cshtml sets the _Layout.cshtml.
@{
ViewBag.Title = "Home Page";
Layout = "~/Views/Shared/_myLayoutPage.cshtml";
}
<div className="jumbotron">
<h1>ASP.NET</h1>
<p className="lead">ASP.NET is a free web framework for building great Web sites and Web applications using HTML, CSS and JavaScript.</p>
<p><a href="http://asp.net" className="btn btn-primary btn-lg">Learn more »</a></p>
</div>
<div className="row">
<div className="col-md-4">
<h2>Getting started</h2>
<p>
ASP.NET MVC gives you a powerful, patterns-based way to build dynamic websites that
enables a clean separation of concerns and gives you full control over markup
for enjoyable, agile development.
</p>
<p><a className="btn btn-default" href="http://go.microsoft.com/fwlink/?LinkId=301865">Learn more »</a></p>
</div>
<div className="col-md-4">
<h2>Get more libraries</h2>
<p>NuGet is a free Visual Studio extension that makes it easy to add, remove, and update libraries and tools in Visual Studio projects.</p>
<p><a className="btn btn-default" href="http://go.microsoft.com/fwlink/?LinkId=301866">Learn more »</a></p>
</div>
<div className="col-md-4">
<h2>Web Hosting</h2>
<p>You can easily find a web hosting company that offers the right mix of features and price for your applications.</p>
<p><a className="btn btn-default" href="http://go.microsoft.com/fwlink/?LinkId=301867">Learn more »</a></p>
</div>
</div>Specify Layout Page in Action Method
Specify the layout view name as a second parameter in the View() method, as shown below. By default, layout view will be searched in the Shared folder.
public class HomeController : Controller
{
    public ActionResult Index()
    {
        return View("Index", "_myLayoutPage"); //set "_myLayoutView" as layout view
    }
}
Rendering Methods
ASP.NET MVC layout view renders child views using the following methods.
| Method | Description |
|---|---|
| RenderBody() | Renders the portion of the child view that is not within a named section. Layout view must include the RenderBody() method. |
| RenderSection(string name) | Renders a content of named section and specifies whether the section is required. |
The following figure illustrates the use of the RenderBody() and RenderSection() methods.
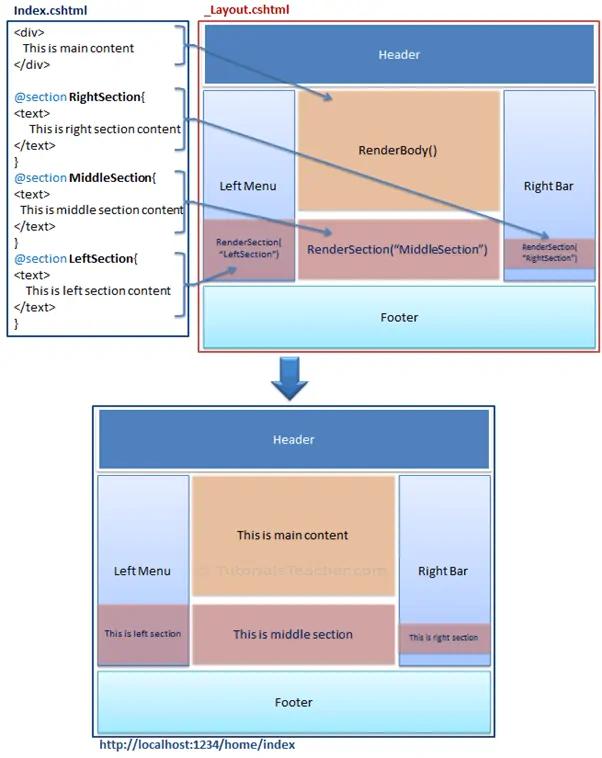
As you can see in the above figure, the _Layout.cshtml includes the RenderBody() method and RenderSection() method. Above, Index.cshtml contains the named sections using @section where the name of each section matches the name specified in the RenderSection() method of a layout view _Layout.cshtml, e.g. @Section RightSection. At run time, the named sections of Index.cshtml, such as LeftSection, RightSection, and MiddleSection will be rendered at appropriate place where the RenderSection() method is called. The rest of the Index.cshtml view, which is not in any of the named section, will be rendered in the RenderBody() is called.
Let's create a new layout view to understand the above render methods in the next section.
Learn the Difference between RenderBody and RenderSection methods.
